Grabbing with triggers
- See also

 Availability
 Previous
- Next

-
Set up and enable a timer (for example, M_TIMER1). If your camera can use an external exposure control signal, the timer output signal's active portion (M_TIMER_DURATION) can be used as the exposure duration. For information on how to set-up a timer and route its output to a camera, refer to the Timers and coordinating events section of Chapter 41: I/O signals and communicating with external devices.
-
Specify the source of the trigger signal for the grab, using MdigControl() with M_GRAB_TRIGGER_SOURCE. For example, if using timer 1 from the previous step, set M_GRAB_TRIGGER_SOURCE to M_TIMER1.
-
Specify to trigger the grab upon the rising edge and/or the falling edge, or the high or low state, of the timer output signal, using MdigControl() with M_GRAB_TRIGGER_ACTIVATION.
-
Set the digitizer to wait for a trigger after a grab command is issued before grabbing, using MdigControl() with M_GRAB_TRIGGER_STATE set to M_ENABLE.
-
Issue a grab command (MdigGrab(), MdigGrabContinuous(), or MdigProcess()). Since the grab trigger state was enabled, the digitizer will wait for a trigger before grabbing each frame.
Upon a grab command (MdigGrab(), MdigGrabContinuous(), or MdigProcess()) in normal untriggered mode, the digitizer always grabs the next valid frame. However, if the camera is continuously streaming images, the frame grabbed might not be the required frame. If this is the case and you want to grab a frame upon a specific event (for example, an object passing in front of a sensor), you need to issue the grab command in triggered mode (triggered grab); that is, you must have the digitizer wait to receive a trigger signal before performing the grab command.
You can specify to perform a triggered grab and control trigger settings either in MIL using MdigControl() with the M_GRAB_TRIGGER... control types, or using an appropriate digitizer configuration format (DCF); for examples of DCF files, see the Camera Interface Application Notes for your camera, available on Matrox's website.
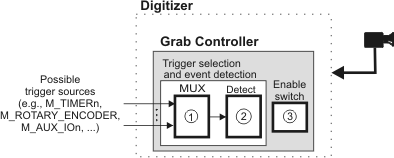
|
Callout # |
MdigControl() control type |
|
1 |
|
|
2 |
|
|
3 |
Note that some cameras support triggered acquisition; that is, they support acquiring and transferring frames (or lines) only upon receiving an external trigger. In this case, the allocated digitizer must be in continuous mode (untriggered mode) to grab all the frames (or lines) sent by the camera.
When working with network cameras (for example, GigE cameras), the M_GRAB_TRIGGER... control types always control the trigger settings of the camera; the digitizer (on the Host side) is always left in continuous mode.
If supported by your digitizer, you can also trigger a grab with a software trigger using MdigControl() with M_GRAB_TRIGGER_SOURCE set to M_SOFTWARE. In this case, following a grab call, nothing is grabbed until you call MdigControl() with M_GRAB_TRIGGER_SOFTWARE. Note that the grab call must be asynchronous (that is, you must issue the grab with MdigGrab() in asynchronous mode or with MdigGrabContinuous()), or the grab call must be made on a separate thread.
Note that, the remainder of this section does not deal with network cameras.
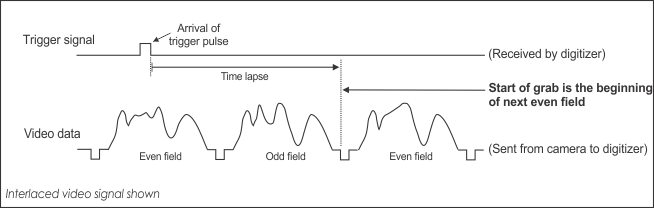
Simple triggered grab
In a simple triggered grab, when the digitizer receives a trigger signal, the digitizer waits for the video data to reach the start of a new frame before it begins to grab an image. For example, in the illustration below, the digitizer receives a trigger signal when the camera has already started to stream a new frame. The digitizer will only grab an image once the current frame has completed streaming and the camera starts streaming the next frame.
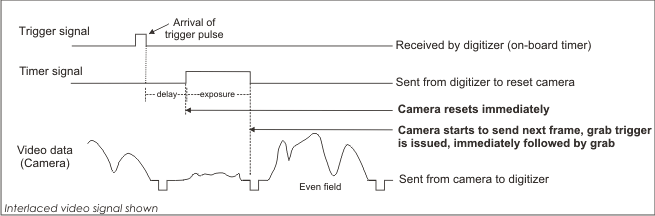
Triggered grab with a camera in asynchronous reset mode
With a simple triggered grab, it is possible that the image grabbed is not the image you intended to grab because the time lapse between the arrival of the trigger pulse and the start of the next valid frame might not have been within your required tolerances. To more accurately schedule a triggered grab, a timer output signal can also be sent to reset the camera, if the camera is in asynchronous reset mode.
In a triggered grab with camera reset, as illustrated below, the digitizer receives a trigger signal that is sent to activate an on-board timer. Upon the rising edge of the timer output signal, the camera will stop transmitting the current frame, reset, and re-expose its CCD; it will then immediately start sending the next frame. In this illustrated example, the grab controller is triggered on the falling edge of the timer output signal. Note that the camera exposure duration is typically set using a third-party camera vendor tool or if supported, a GenICam interface (for example, MdigControlFeature() or Matrox Intellicam's feature browser); if this is the case, the exposure time is fixed by the camera's internal exposure control settings. When the camera can use an external exposure control signal, the active portion of the timer output can be used to specify the exposure duration.
To set up a triggered grab that uses a timer to reset the camera and control the exposure time, as illustrated above, perform the following steps:
Triggering on level high or level low
As mentioned above, you can specify to trigger the grab upon the rising edge and/or the falling edge, or the high or low state of a signal, using MdigControl() with M_GRAB_TRIGGER_ACTIVATION. Triggering on the high or low state of a signal is useful when grabbing from a line scan camera with frames of variable length, such that you cannot specify the number of lines to grab for each image at the beginning of each grab. In this case, you would use your trigger signal to also indicate when to stop the grab; while the trigger signal is high (or low), it would continuously trigger to grab the next line of data, and while the trigger signal is in the opposite state, it would not issue any trigger so no lines would be grabbed. For example, if you want to grab an image that includes only the object to analyze, you can use the signal from a sensor as a trigger signal to grab. Then, set the trigger activation mode to M_LEVEL_HIGH so that the digitizer is continuously triggered to grab during the signal's level high. When the sensor detects the presence of an object on a conveyor belt, have it transmit a level high signal; if there is no object passing through the sensor, have it transmit a level low signal.
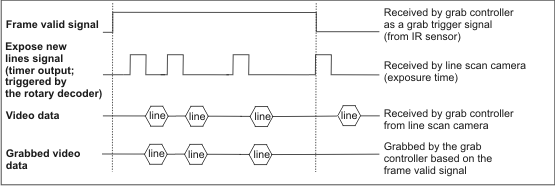
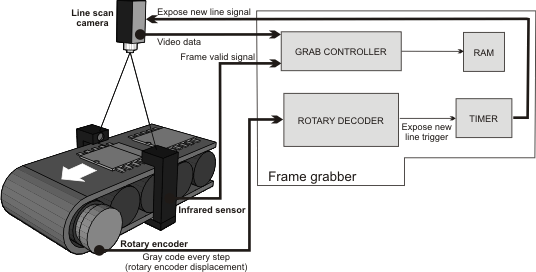
The following image depicts a frame grabber connected to a sensor to grab images of objects on a conveyor belt when they pass through the sensor. In this setup, the line scan camera exposes a new line if the object moves forward. A rotary encoder is used to detect movement. A sensor is used to detect when to grab and when not to grab. For more information on rotary decoders, refer to the Using quadrature input from a rotary encoder section of Chapter 41: I/O signals and communicating with external devices.
The following image shows the timing diagram of the set-up shown above, with M_GRAB_TRIGGER_ACTIVATION set to M_LEVEL_HIGH. Note that lines are only grabbed when the frame valid signal (the grab trigger signal) is high.