Search constraints
When a model is defined (whether manually or automatically), it is assigned a set of default search constraints. You can change the following constraints:
-
The number of occurrences to find.
-
The threshold for acceptance and certainty.
-
The model's reference position.
-
The region to search in the target image.
-
The positional accuracy.
-
The search speed.
Specifying the number of matches
You can specify how many matches to try to find, using MpatSetNumber(). If all you need is one good match, set the required number of occurrences to one (the default value) and avoid unnecessary searches for further matches. If a correlation has a match score greater than or equal to the certainty level, it is automatically considered an occurrence (default 80%), the remaining occurrences will be the best of those greater than or equal to the acceptance level.
When you ask for a specific number of matches (using MpatSetNumber()), the MpatFindModel() function might not find that number; you should always call MpatGetNumber() to see how many occurrences were actually found. When multiple results are found, they are returned in decreasing order of match score (that is, best match first).
Setting the acceptance level
The level at which the correlation (match score) between the model and the pattern in the image is considered a match is called the acceptance level.
You can set the acceptance level for the specified model, using MpatSetAcceptance(). If the correlation between the target image and the model is less than this level, they are not considered a match. A perfect match is 100%, a typical match is 80% or higher (depending on the image), and no correlation is 0%. If your images have considerable noise and/or distortion, you might have to set the level below the default value of 70%. However, keep in mind that such poor-quality images increase the chance of false matches and will probably increase the search time.
Note, perfect matches are generally unobtainable because of noise introduced when grabbing images.
Setting the certainty level
The certainty level is the match score (usually higher than that of the acceptance level) above (or equal to) which the algorithm can assume that it has found a very good match and can stop searching the rest of the image for a better one. The certainty level is very important because it can greatly affect the speed of the search. To understand why, you need to know a little about how the search algorithm works.
Since a brute force correlation of the entire model, at every point of the image, would take several minutes, it is not practical. Therefore, the algorithm has to be intelligent. It first performs a rough but quick search to find likely match candidates, then checks out these candidates in more detail to see which are acceptable.
A significant amount of time can be saved if several candidate matches never have to be examined in detail. This can be done by setting a certainty level that is reasonable for your needs, using MpatSetCertainty(). A good level is slightly lower than the expected score. If you absolutely must have the best match in the image, set the level to 100%. This would be necessary if, for example, you expect the target image to contain other patterns that look similar to your model. Unwanted patterns might have a high score, but this will force the search algorithm to ignore them. Symmetrical models fall into this category. At certain angles symmetrical models might seem like an occurrence in the target image, but if the search was completed, a match with a higher score would be found.
Often, you know that the pattern you want is unique in the image, so anything that reaches the acceptance level must be the match you want; therefore, you can set the certainty and acceptance levels to the same value.
Another common case is a pattern that usually produces very good scores (say above 80%), but occasionally a degraded image produces a much lower score (say 50%). Obviously, you must set the acceptance level to 50%; otherwise you will never get a match in the degraded image. However, you cannot set the certainty level to 50% because you take the risk that it will find a false match (above 50%) in a good image before it finds the real match that scores 90%. A better value is about 80%, meaning that most of the time the search will stop as soon as it sees the real match, but in a degraded image (where nothing reaches the certainty level), it will take the extra time to look for the best match that reaches the acceptance level.
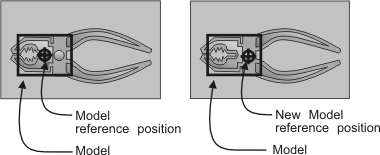
Redefining the model's reference position
The coordinates returned by MpatGetResult(), after a call to MpatFindModel(), are the coordinates of the model's reference position (in pixel or real-world units, depending on whether the camera setup is calibrated; for more information, see Chapter 25: Calibrating your camera setup). By default, this reference position is defined to be at the geometric center. Note that, when using pixel units, results are returned relative to the top-left corner of the target image.
If there is a particular spot from which you would like results returned, you can change the model's reference position, using MpatSetCenter(). For example, if your model has a hole and you want to find results with respect to this hole, change the reference position of the model accordingly. Note that you can define the reference position to be outside of the model's boundary.
Selecting the search region
Instead of searching the entire region of an image, you can limit the search region with MpatSetPosition(). This function specifies the region in which to find the model's reference position. Therefore, the search region can even be smaller than the model. If you have redefined the model's reference position (with MpatSetCenter()), make sure that the search region defined by MpatSetPosition() covers this new reference position and takes into account the angular search range of the model.

Alternatively, you can limit the operation to a region of the image buffer, using a rectangular region of interest (ROI) set using MbufSetRegion(). Doing so will cause an increase in processing time, but it is more flexible than setting a search region using MpatSetPosition() because it allows a search at an angle and it is possible to define your search region in world units.
In general, you should not use a child buffer to delimit the search region to a portion of an image; this might cause the search routine to have border or edge effects and be less accurate (the routine does not assume that there is valid data outside of the buffer).
Search time is roughly proportional to the region searched; always set the search region to the minimum required when speed is a consideration.
Positional accuracy
You can set the positional accuracy for your search. Use MpatSetAccuracy() to set the required positional accuracy. It can be set to:
Note, the actual precision achieved is dependent on the quality of the model and of the image (the tolerances listed above are typical for high-quality, low-noise images).
A less precise positional accuracy will speed up the search. Positional accuracy is also slightly affected by the search speed parameter (MpatSetSpeed()).
Setting the speed parameter
You can specify the algorithm's search speed, using MpatSetSpeed(). When the search speed is set to M_VERY_HIGH or M_HIGH, the search algorithm takes more shortcuts, and the search is performed faster. However, as you increase the speed, the robustness of the search operation (the likelihood of finding a model) can decrease. For more information on search speed, see the Speeding up the search section later in this chapter.